Book Appointment Now

How Do You Make a Fishing Pole
Build a fishing pole by choosing the blank material, matching length and action to your style, installing guides and wraps, and fitting a reel seat and handle for balance. Pick fiberglass for toughness or graphite for sensitivity, then space guides and wrap thread neatly. Finish with epoxy, do trial casts, and address any broken line or loose guides. Options include cane, spinning, or surf poles, plus grip and decorative choices and parts ranging from budget to premium.
Build Overview and Essential Parts
In case you’re ready to make a fishing pole, start with grasping the essential parts and how they work together so you won’t feel lost or stressed out.
You’ll initially meet the blank which sets strength and flex. Then you add the handle made from cork, EVA, or rubber that feels like it was made for your hand. Guides line the blank so your line runs true. A reel seat holds your reel steady and balances the setup. Ferrules let you break the pole down for travel. A hook keeper gives you a safe place for hooked rigs whenever you’re not casting. A butt cap protects the end during use and storage.
These parts fit like a team and you’ll enjoy building each piece.
Choose the Pole Type: Cane, Spinning, or Surf
At the time you pick between a cane, spinning, or surf pole you’ll want to match material and flexibility to the fish and water you’ll face.
Consider handle and reel choice next since cork or EVA grips and fixed or spinning reels change comfort and balance.
Then choose length and action to control casting distance and hook-setting power so the rod feels right in your hands.
Material And Flexibility
Although you could believe all fishing poles feel the same, choosing the right material and flexibility will change how confident and comfy you’re on the water. When you pick a blank material, consider fiberglass for material durability and toughness, graphite for light sensitivity, or composites for a balanced feel.
You want a rod that bends the right way for your style. Do flexibility evaluation through loading the tip and flexing the blank to see action and recovery. Try different bends and envision casting and fighting fish. As you test, consider weight, power, and how the rod returns to neutral. That shared process helps you join others who care about gear that fits their hands and goals.
Handle And Reel Choice
Because the handle and reel shape how comfortable and capable you’ll feel on the water, choosing the right pole type matters more than you could envision.
You want a cane pole for simple shore fishing provided you prefer old school ease. A spinning setup gives you versatility for light lures and friendly casting. A surf rod pairs with larger reels for distance and strength.
Pay attention to handle ergonomics so your grip stays steady during long sessions and everyone around you feels welcome to join. Match reel balancing to the reel seat and blank so the pole feels natural in your hands. Reflect on cork or EVA grips, a secure reel seat, and how guides change line flow. These choices help you fit right in with fellow anglers.
Length And Action Selection
Picking the right length and action for your pole will change how you cast, how you fight fish, and how tired you feel after a long day on the water. You’ll pick cane for simple strength, spinning for versatile freshwater use, or surf for long casting distance from the beach.
Match rod length to your spot and species so your casting distance and accuracy improve. Consider action type too, fast for quick hooksets and sensitivity, medium for general use, and slow for gentle play with small fish.
Reflect on how the blank material and guides affect feel and weight. You belong here, learning choices that fit your style, so try setups and trust what feels right.
Pick the Right Length and Action for Your Fishing Style
Once you head out to build a rod that matches your fishing, start with considering length and action because these two choices shape how the rod feels and how it performs on the water. You want a rod that fits your crew and your confidence. Shorter rods give control in tight spots and better accuracy for specific casting techniques, while longer rods help you cast farther in open fishing environments. Match action to lure weight and species so you feel the bite and land fish without losing connection.
| Length | Best Use |
|---|---|
| Short | Shorelines, cover |
| Medium | Versatile, small boats |
| Long | Open water, long casts |
Choose what feels right. You’ll join others who fish with purpose and care.
Choose Materials for Blank, Guides, Reel Seat, and Handle
Now you’ll pick the blank and handle materials that match how you fish and how the rod should feel in your hands.
Consider blanks made from fiberglass for durability, graphite for sensitivity, or composites for a balanced mix, and then choose a handle from cork, EVA foam, or rubber to suit comfort and grip.
These choices affect weight, action, and comfort, so take a moment to match materials to your preferred fishing style and conditions.
Selecting Blank Materials
Because the blank is the heart of your rod, you want to choose materials that match how you fish and how the rod should feel, cast, and hold up over time. You’ll weigh fiber types like fiberglass, graphite, or blends that mix both.
Fiberglass gives toughness and slower action for bait fishing. Graphite provides light weight and sensitivity for quick hooks and long casts. Composites blend those traits so you get durability plus feel.
Pay attention to carbon properties in case you want strength with low weight. Also consider guide and seat compatibility so balance stays right. Choose blanks that fit your style and the fish you chase. You’ll feel proud using a blank that suits your crew and your spots.
Choosing Handle Components
While you pick handle components for your fishing pole, consider about how each part will work together so the rod feels right in your hands and performs the way you expect.
Start with a blank material that matches your style, like graphite for sensitivity or fiberglass for toughness, because that affects balance with the handle. Select cork comfort in case you want classic feel and less fatigue, or rubber grips for secure hold in wet weather. Match a reel seat that sits flush with the grip to spread weight evenly.
Pick single-foot guides for light rods or double-foot for heavy loads so line flow and strength align with blank choice. Blend materials thoughtfully so everything fits, looks good, and welcomes you to fish more.
Gather Tools and Set Up Your Workspace
Before you begin building your fishing pole, take a few minutes to organize a clear, well-lit workspace so you can work confidently and without interruptions. You’ll want good workspace lighting and a plan for tool maintenance so tools stay reliable and safe. Lay out tools according to task so everything feels familiar and welcoming.
- Cutting tools and sandpaper for shaping blanks and handles
- Thread, epoxy, and brushes for wraps and sealing
- Guides, reel seat, and clamps for fitting and alignment
- Measuring tools, marker, and a stable workbench or jig
Keep a towel, trash bin, and initial aid kit nearby to stay calm in case things get messy. Clean and store tools after use to protect your gear and keep the space inviting for the next build.
Mark the Blank for Guides and Reel Seat
Now that your bench is set and tools are within reach, you’ll want to move the blank from the work area toward a marking setup where accuracy matters. Lay the blank on padded supports and rotate it slowly. Sight down the blank to find the spine or natural bend. Mark the reel alignment lightly with a pencil so your reel foot will face the spine for comfort.
Measure guide placement from the tip using the blank maker chart or the spacing rule you chose. Mark each guide position and the tip top. Check that marks line up on each section for multi piece blanks.
Confirm positions through dry fitting guides and the seat. This careful step makes later wrapping and epoxy work smooth and confident.
Install the Handle and Reel Seat on Your Rod, Step‑by‑Step
Now you’ll pick the handle material that fits your fishing style, whether that’s comfy cork for long days or grippy EVA foam for wet conditions.
Next you’ll align the reel seat carefully so the reel sits straight with the guides, checking fore and aft for balance.
Finally you’ll secure everything with the right epoxy, working cleanly and patiently so the bond is strong and the finish looks professional.
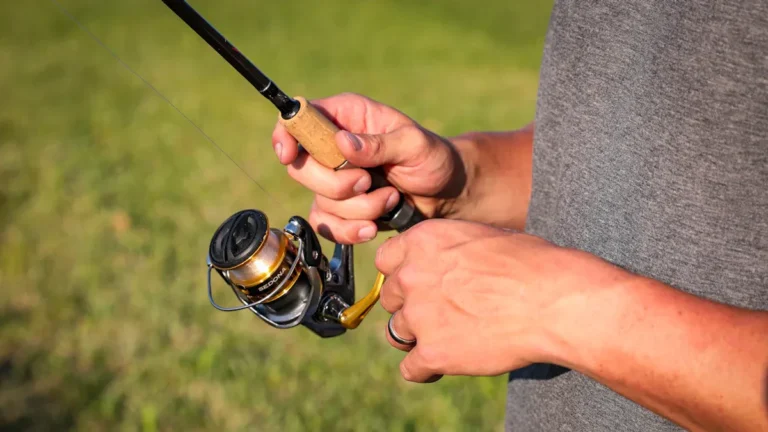
Choosing Handle Material
Whenever you pick a handle material for your rod, consider about how you want it to feel in your hands and how you’ll use the rod most of the time. You want a clear durability comparison and good grip comfort so the rod stays pleasant on long trips.
Reflect on weight, sweat resistance, and how the handle mates to the reel seat. Choose materials that match your fishing style and the blank’s balance.
- Cork for classic feel and low fatigue during long days
- EVA foam for non slip control and easy cleaning after saltwater use
- Rubber for tough, wet conditions and heavy duty fights
- Hybrid composites for balanced weight and modern ergonomics
These choices help you fit into the community of careful builders.
Aligning Reel Seat
Before you glue anything down, take a breath and plan where the reel seat will sit so the balance and comfort of the rod match how you fish. You belong here, and this step helps your rod feel like an extension of you. Use simple alignment methods: sight down the blank, rest the reel in your hand, mark the spine and handle center. Make seating adjustments by sliding the seat forward or back a few millimeters until the grip feels natural and the reel foot aligns with guides. Share choices with friends or mentors in case you want company while you assess feel. The table below paints an image of common setups and positions for different styles.
| Style | Typical Position |
|---|---|
| Spinning | 70 mm from butt |
| Baitcasting | 90 mm from butt |
| Light jigging | 60 mm from butt |
Securing With Epoxy
You’ve picked the spot for the reel seat and felt how the handle fits your hand, so let’s secure them with epoxy and make that fit last. Mix a two part epoxy with attention to epoxy types and set up in a clean, dust free curing environment.
You want steady alignment, gentle pressure, and time to let the bond build. We’ll walk it through so you feel supported and confident.
- Choose slow cure for complex builds or fast cure for quick projects
- Clamp lightly and check alignment every few minutes
- Keep the workspace warm and draft free for even curing
- Clean excess epoxy with a rag and solvent before it skins
You’re joining a community that cares about craft and care.
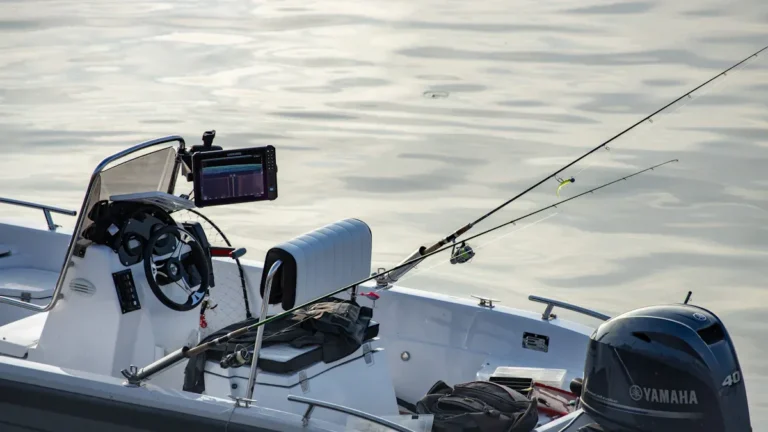
Place and Attach Guides for Smooth, Balanced Casting
As soon as you line up and attach the guides correctly, your rod will cast smoother, feel balanced, and put less strain on your arms during long days on the water. You want consistent guide placement for casting balance and confidence. Start at the tip, space guides toward the handle, and check alignment with the reel foot. Feel proud as each guide improves line flow and reduces wobble. You belong to builders who care about small details that make big differences.
| Guide Type | Position | Purpose |
|---|---|---|
| Tip | End | Directs line |
| Small | Upper blank | Reduces friction |
| Medium | Mid blank | Supports load |
| Large | Near handle | Adds strength |
Wrap Guides With Thread: Technique and Tension Tips
Now that your guides are lined up and attached, wrapping them with thread is what makes them stay true and smooth under load. You’ll want steady hands and a calm pace.
Start with a base touch to lock the foot, then build neat overlapping turns while keeping even tension. That tension adjustment determines cast feel and thread durability, so evaluate as you go. Use consistent pressure, watch for gaps, and keep wraps snug not crushing.
- Keep thread aligned and perpendicular to the blank for clean bands
- Pause often to check guide alignment and correct any drift
- Trim ends close and tuck the tag under wraps for neatness
- Practice on a scrap blank to learn pressure and spacing
You belong here, learning alongside others who care about craft.
Apply Epoxy to the Rod: Mixing, Brushing, and Curing
Once you’re ready to seal your wraps and parts, getting the epoxy mix right is the initial step because too much or too little hardener will ruin the finish.
Use gentle, even brush strokes to lay the epoxy smoothly over threads and guides, and keep a wet edge so you don’t get streaks or bubbles.
Finally, plan for proper curing time in a dust-free, steady-temperature spot so the coat hardens strong and glossy without tackiness.
Mixing Epoxy Properly
- Measure parts accurately each time
- Keep workspace steady warm and clean
- Mix slowly and scrape frequently
- Use timers to track working time
Brushing Technique Tips
Although epoxy can feel intimidating initially, you’ll get steady, professional results provided you follow a few clear brushing habits and stay patient.
Choose brush selection carefully. Use a high-quality soft nylon or natural-hair brush sized for your rod diameter. A small flat brush smooths wraps while a round brush helps reach guide feet. Work in thin passes and keep a wet edge so you avoid ridges.
Practice epoxy layering through applying light coats and letting each tack slightly before the next. Rotate the rod slowly on a cradle so gravity spreads resin evenly.
Clean brushes between passes to prevent clumps. In case bubbles appear, stroke gently toward them to pop and smooth.
Trust the process, lean on steady motion, and you’ll belong to a group that finishes rods with honor.
Curing Time Guidelines
You’ve got the brush strokes down and the wraps looking tidy, so now you’ll want to focus on how long epoxy needs to set and why timing matters for a strong, smooth finish. You and your crew should plan curing around the curing environment. Cooler nights slow curing. Warmer days speed it up. Keep epoxy temperature steady to avoid bubbles and sags.
- Check manufacturer cure times and match them to your workshop conditions
- Keep the rod level and protected from dust while the epoxy skins over
- Use gentle warmth or a consistent space heater should epoxy temperature be low
- Avoid direct sun or heat spikes that can flash cure and weaken the finish
You’ll feel confident once you control time, temp, and the space you share with others.
Add Line, Test Casts, and Tune Guide Alignment
Get ready to finish your rod through spooling on line, making a few trial casts, and fine tuning the guide alignment so everything works together smoothly.
You’ll spool the reel, check line tying knots, and seat the line through each guide.
Then you’ll take gentle casting practice in an open space. Move slowly at the outset. Watch how the line flows over guides and how the blank flexes.
In case the line hugs one side, loosen wraps or nudge guide feet to realign them. Small shifts make big changes.
Evaluate different cast lengths and lure weights to see balance and feel.
You’ll listen for friction, feel for vibration, and keep adjusting until casts are smooth and confident.
You belong to this caring group of makers.
Troubleshoot Common Beginner Problems (Broken Line, Loose Guides)
Ever questioned why your line keeps breaking or a guide works loose just as you’re getting a good cast? You’re not alone, and you’ll get steady fixes you can trust. Start through checking for sharp nicks on the blank, hook keeper, and reel seat that cause line snapping.
Then inspect guides for guide shifting and loose wrappings. Tighten or rewrap with nylon thread and epoxy should a guide move.
- Look along the blank for burrs or rough spots that cut line
- Evaluate each guide alignment through running line through while lifting the rod
- Rewrap loose guides with clean thread, maintain even tension
- Sand and polish nicked spots before reapplying finish
These steps keep you confident and connected to the rod.
Add Grips, Decorative Wraps, and Small Performance Upgrades
Once you’re ready to make your rod feel like it was made for your hands, adding grips, decorative wraps, and a few small performance enhancements is the easiest way to get there. You’ll choose grips for comfort and control, using cork, EVA foam, or hybrid inserts. Grip customization helps fit your hand size and fishing style. Decorative wraps add personality and protect thread windings. Small upgrades like swapping to single foot guides for light action or a low profile reel seat enhance feel and function.
| Item | Purpose | Tip |
|---|---|---|
| Cork grip | Comfort | Sand gently for fit |
| EVA foam | Non slip | Heat to shape |
| Decorative wraps | Style and seal | Use nylon thread |
| Single foot guides | Light action | Space evenly |
| Low profile seat | Balance | Evaluate with reel |
Cost Breakdown and Where to Source Parts (Budget to Premium)
Although you could believe building a rod has to be expensive, you can put together a reliable setup at almost any price point, and I’ll walk you through where to buy parts and what to expect to pay.
You’ll find places for budget sourcing like general online marketplaces and kits that include blanks, grips, guides, and epoxy. In case you want higher performance and finish, premium vendors and specialty shops sell T24 blanks, forged guides, and custom cork handles. Moving from budget to premium, expect better materials, tighter tolerances, and longer warranties.
- Starter kits: $40 to $100, good for learning
- Mid-range parts: $100 to $250, better blanks and guides
- Premium builds: $300+, T24 carbon and custom work
- Tools and epoxy: $30 to $150 depending on quality
Frequently Asked Questions
Can I Convert a Vintage Bamboo Rod Into a Modern Fishing Pole?
Yes - you can: envision one bamboo strip among thousands restored; you’ll use restoration techniques to preserve cane, add modern components like guides, reel seat and epoxy finishes, and you’ll join a proud restoration community.
How Do Weather Extremes Affect Epoxy Curing and Rod Durability?
Extreme temperature variations slow or accelerate epoxy curing and can cause brittle or soft finishes; humidity impact can cause blush, poor adhesion, or long cure times. You’ll want to control environment so your rod stays reliable.
What Safety Precautions for Fritting Carbon Dust When Cutting Blanks?
Yes - you’ll need strict controls: wear proper dust masks, use strong ventilation systems, wet-cut to reduce dust, seal work area, use HEPA vacuums, goggles and gloves, and buddy up so everyone watches safety together.
Can I Legally Sell Custom-Made Rods Without Certifications or Warranties?
Yes - you can sell custom rods, but you’ll need business licenses, follow consumer protection laws, and be transparent about warranties or disclaimers; joining local maker communities helps you share resources, credibility, and mutual support.
How Do I Ship Assembled Rods Safely Without Damaging Tips or Guides?
Pack rods in protective tubes, then wrap tips and guides with bubble wrap and foam; secure in a sturdy box with braces or crumpled filler so each rod can’t shift. You’ll feel confident shipping safely.