Book Appointment Now

Fishing Rod Repair Guide: Easy DIY Fixes
Fixing a fishing rod is easier than it sounds and well within reach for most anglers. This guide walks through simple checks for guides, tip-tops, the blank, handle, and reel seat, plus quick field fixes and workshop swaps using compact tools and household adhesives. Start with a visual inspection for cracks and rough rings, then move on to fast guide repairs, rewrapping threads, replacing tip-tops, and finishing with sanding and thin epoxy coatings while rotating the rod to avoid drips. Finish with care and storage tips to keep repairs strong.
Quick Fixes to Get Back on the Water
On spotting a broken guide right before a trip, stay calm and know you can fix it fast and get back on the water. You’ll feel part of a crew whenever you tackle field repairs with simple steps and friendly help from local tackle shops.
Start starting with cleaning the area, seating the guide in the channel, and using masking tape to hold position. Practice roadside gluing to tack the foot, then wrap and add small glue drops as you work.
Check quick alignment by sighting up the blank and adjusting before glue sets. You’ll appreciate tips from nearby anglers, spare thread options, and a steady hand. You’ll leave confident, connected, and ready for the cast.
Tools for Field and Workshop Repairs
Gather your kit and feel confident: the right tools make field and workshop repairs faster and less stressful. You’ll want a compact toolkit that fits a tackle box and a bench. Include a razor blade for removing old bindings, fine sandpaper, and a small set of pliers and cutters. Pack size D nylon thread, extra guide feet, masking tape, and a few replacement tips.
Also carry emergency adhesives like super glue and a quick-set epoxy for fast fixes. Keep Teflon tape, a small brush, and a syringe for precise glue placement. Add a folding ruler, cloth, and acetone wipes to clean surfaces. These tools help you work neatly, keep your mates calm, and let you fix rods together with confidence and satisfaction.
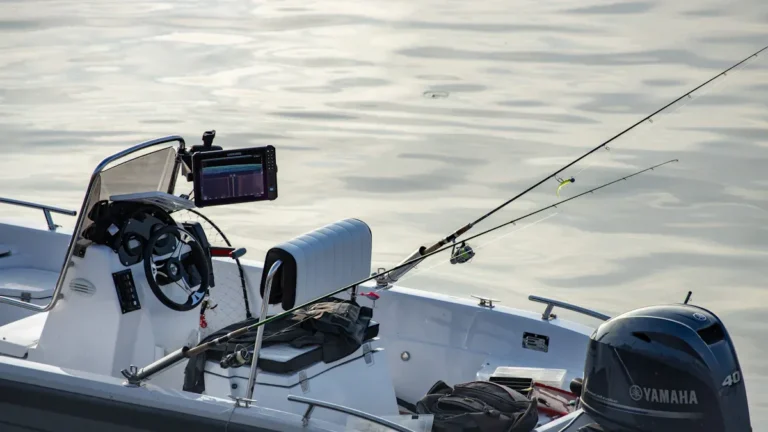
Inspect Your Rod: Guides, Blank, Handle, Reel Seat
Start next checking the guides and tip for cracks, missing inserts, or grooves that can fray your line, and gently run your finger along each ring to feel for rough spots.
Then inspect the handle and reel seat for looseness, worn grip material, or corrosion, because a shaky reel or slipping handle can ruin a day on the water.
Should you find damage, keep notes on each issue so you can address guide repairs, blank cleaning, or reel seat tightening in the right order.
Guide And Tip Condition
Upon picking up your rod to inspect the guides and tip, take a slow, careful look for cracks, missing inserts, bent rings, or loose feet that can ruin a cast or break a line mid-fight.
You want to catch guide corrosion promptly and confirm tip alignment by sighting down the blank. Gently roll the rod and run a cotton swab along each guide to feel rough spots.
Should you find damage, you’ll remove and replace the part, cleaning the blank beforehand so new fittings sit right. Stay calm; this is fixable and you’re part of a community that helps each other.
- Check for cracked inserts and bent rings
- Feel for roughness indicating corrosion
- Verify tip alignment visually
- Look for loose guide feet
- Observe missing inserts for replacement
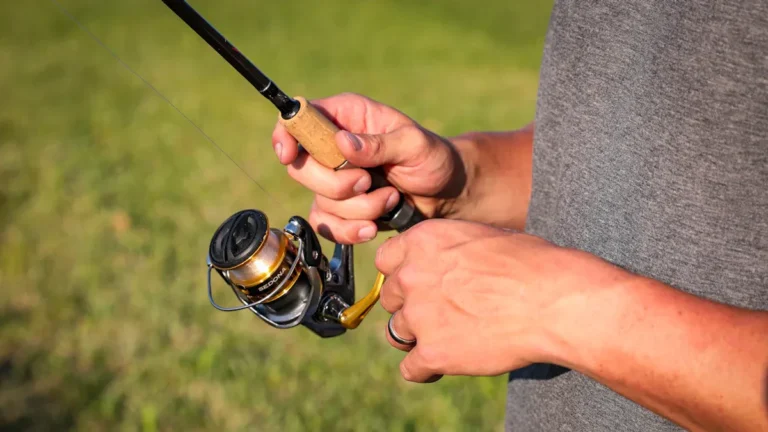
Handle, Reel Seat Check
Check the handle and reel seat carefully because these parts keep you comfortable on long trips and hold your reel steady whenever a fish runs. You belong here, so treat your rod like a teammate. Start with a grip inspection. Feel for soft spots, cracks, or loose wrap. Clean grime with mild soap and a soft cloth. Move into the reel seat. Tighten it and look for play whenever you wiggle the reel. In case metal is corroded, sand lightly and protect with a touch of oil.
Now do balance evaluation. Mount your reel and hold the rod at the grip midpoint. It should feel centered, not tip heavy. Adjust reel position or handle padding until it feels right.
Fix a Broken Guide Foot (Fast Field Repair)
Initially check the guide foot and surrounding blank to see how bad the break is and whether the guide can stay in place for now.
In case the foot is loose but the ring is intact, wrap thread tightly around the foot and blank to hold it while you get home or to the next spot.
Should the foot be gone, plan to replace it with a footless guide and secure it with a quick dab of super glue and neat thread wraps so your rod fishes safely until you can do a full repair.
Assess The Damage
Upon spotting a broken guide foot on your rod, take a calm, steady look and decide how bad it’s before you touch anything; you’ll avoid making small problems worse. You want to follow basic safety precautions initially, then make clear damage documentation with a quick photo and notes. This helps you feel confident and connected to others who fix rods.
- Is the guide foot bent or snapped off
- Are surrounding wraps or blank finish gouged
- Does the ring still seat straight or wobble
- Can you realign the foot without pulling more material
- Is there epoxy left that you can safely remove
These checks guide your next steps and keep you part of a caring repair community.
Temporary Thread Wrap
Whenever a guide foot snaps while you’re out on the water, you can rig a fast temporary thread wrap that holds the guide in place until you get home. You’ll feel calmer knowing you’re not stranded.
Start along aligning the guide and taping it lightly so it stays straight. Use a doubled strand of strong thread and wind tight, even wraps from one side of the foot to the other. Add field knots where the tag end needs security and cinch them down with pliers or fingers. Dab a little super glue as you wrap to lock fibers. Trim the tag close and add more wraps should it feel loose. This temporary thread fix keeps your guide functional and helps you stay part of the fishing community.
Replace With Footless Guide
You can fix a broken guide foot fast through switching to a footless guide that slips over the rod tip and keeps you fishing until you can do a full repair. You’ll feel part of a handy crew whenever you pull a compact footless guides kit from your pack, pick the right size, and prep the tip quickly. Choose adhesive selection based upon speed and bond strength. Clean the blank, tape alignment, then slip the guide on and add one small glue drop. You’re back casting in minutes with confidence and company.
- Carry small footless guides in common sizes
- Bring a fast curing adhesive for field fixes
- Clean the tip with acetone before fitting
- Check alignment through sighting up the rod
- Reinforce with thread wrap should you can
Replace a Cracked or Stripped Tip-Top Guide
A cracked or stripped tip-top guide can ruin a good day on the water, so let’s get it fixed quickly and cleanly so your rod feels right again. You’ll feel welcome doing this with simple tools and a friendly pace.
Initially remove the old tip through cutting toward its base with a razor blade, then clean the blank with acetone. Create a shallow channel from the guide side so the new tip seats flush.
For tip top alignment sight down the rod and use masking tape to hold the new piece. Apply a dab of super glue and press into place for a threadless installation. Recheck alignment while glue sets.
You’ll be back casting soon, confident and connected to your gear.
Rewrap and Secure Loose Guides With Thread & Epoxy
Start through easing the guide into place and getting comfortable with a steady rhythm, because rewrapping a loose guide is a careful task that pays off every time you cast. You’ll seat the guide in its channel, tape it, and begin neat wraps while keeping thread tension steady so the foot sits flat.
Keep your hands relaxed and count wraps, adding small glue dabs as you go. Once wrapped, trim the tag and apply epoxy thinly, watching epoxy hardening to avoid runs. You belong to a community that repairs and protects gear, and you’ll feel proud whenever it looks right.
- Check alignment looking up the rod
- Maintain consistent thread tension
- Use multiple wraps above and below the foot
- Add tiny glue drops during wrapping
- Smooth epoxy during epoxy hardening time
Smooth and Protect Frayed Guide Inserts
Initially, inspect each guide insert closely for cracks, chips, or rough spots so you can spot what needs smoothing.
Then gently sand any rough edges with fine sandpaper and clean the area with acetone before you protect it.
Finally, seal the repaired insert with a thin coat of epoxy to prevent further fraying and keep your line safe.
Inspect The Guide Inserts
Before you touch the thread or epoxy, take a close look at each guide insert so you know what you’re handling with. You’ll do a visual inspection first, then a simple light check to find hairline cracks or pitting. Treat this like caring for a friend’s gear. If you spot insert wear, don’t panic. You’re part of a community that fixes things together.
- Shine a bright light down the guide to reveal chips and cracks
- Run a fingernail gently to feel for rough spots on the insert
- Look for dark lines or shiny wear where the line rides
- Check alignment of the insert with the rod blank
- Note inserts that bounce or move when pressed
This helps you decide repair or replace with confidence and care.
Smooth Rough Edges
You’ve already checked the inserts for chips and movement, so now let’s smooth any rough edges that can fray your line and hurt your gear.
Work with fine sandpaper or a micro file and gently remove burrs from the guide lip. Take small passes and check often so you don’t remove too much. Edge blending matters here to create a gradual shift between the insert and the ring so your line won’t catch. Use a light touch and rotate the rod to keep the surface even.
After you smooth edges, wipe with acetone to clear dust and inspect in good light. Should you feel confident, bond the guide in place and wrap with thread, appreciating you carried out careful prep.
Protect With Epoxy
Smooth the insert and then seal it with epoxy to stop fraying and keep your line safe. You’ll want to sand the frayed edges smooth, clean with acetone, and trial fit the guide.
Mix a clear two part epoxy and work quickly, brushing a thin coat over the insert and thread. Watch for epoxy discoloration and avoid thick pools that yellow in sunlight.
Cure in a dust free spot where UV protection is present or use an epoxy with UV protection to reduce breakdown. You belong to a hands on crew who cares for gear.
Be patient, steady, and proud as you protect that guide.
- Sand smooth before sealing
- Clean with acetone first
- Use thin even coats
- Choose UV stable epoxy
- Inspect for discoloration
Tighten or Realign a Loose Reel Seat
Assuming your reel seat has started to slip or tilt, you can get it snug again without stress provided taking a few steady steps and the right supplies.
Start atop loosening the hood just enough to reposition the reel. Check reel alignment by sighting down the rod so the reel foot sits straight with the blank.
In case the seat is loose, apply a thin film of removable thread locker or a small dab of super glue sparingly where metal meets blank.
Realign the reel and tighten the hood slowly so tension is even.
For tape or minor gaps, wrap low tack tape under the foot to build thickness, then retighten.
Let any adhesive cure fully before casting.
You’re part of a helpful community fixing gear together.
Repair a Cracked or Split Blank (Internal & External Wraps)
Upon finding a crack or split in your rod blank, initially check exactly where the damage sits so you can decide between an internal patch or an external wrap.
Next pick a wrap material that matches the blank strength and flex, like thin carbon or fiberglass thread, and gather epoxy that bonds well to your chosen fiber.
As you prepare to repair, work calmly, apply epoxy evenly, and give it full cure time so the repair holds under pressure.
Assess Damage Location
Start commencing closely inspecting the blank to find exactly where the crack or split is and how deep it runs, because grasping the damage location guides every repair decision you make.
You’ll do damage mapping and location logging so you and your crew feel confident about the fix. Work in good light, run your fingers along the blank, and flex it gently to reveal concealed separations.
Observe internal versus external damage as you mark spots with low tack tape. This careful audit keeps you included in the repair process and reduces surprises later.
- Inspect under bright light for hairline cracks
- Feel for rough edges and flex to reveal splits
- Mark each spot with tape for location logging
- Photograph damage for reference and sharing
- Record depth and length in a notebook
Choose Wrap Material
Picking the right wrap material matters more than you may suppose, because the wrong choice can leave a repair that looks sloppy or fails under load.
You want materials that match strength and style.
Choose quality nylon or polyester thread for most external wraps.
For internal wraps, use thin reinforcing tape or lightweight fiberglass thread to keep the blank flexible.
Consider thread alternatives like dental floss or light braided line when budget or color range matters.
Reflect on color choices to blend repairs with the rod finish or to make a deliberate accent.
Match thread size to guide foot and use doubled ends for strength.
Try a small sample first.
You’ll feel confident when your repair looks intentional and holds up on the water.
Apply And Cure Epoxy
You’ve chosen the right wrap material and now you’ll move on to applying and curing epoxy to repair a cracked or split blank, whether you’re doing an internal patch or an external wrap.
You’ll mix small batches and follow epoxy mixing instructions closely so you don’t waste resin.
Work in a warm, dust free space and keep your circle of friends or fellow anglers nearby for support.
You’ll apply thin even coats, pushing resin into fibers, and rotate the rod slowly to avoid sagging.
Cure timing matters, so check ambient temperature and stick to the manufacturer cure timing for strength.
- Mix equal parts precisely
- Apply thin coats, not one thick
- Rotate rod during cure
- Keep dust out of finish
- Inspect gently after full cure
Patch Cork and EVA Handles Without Replacing Them
Give your worn cork or squishy EVA handle a second chance before you consider replacing it. You’re part of a group that loves gear that lasts, so learn simple cork patching and EVA bonding fixes that bring your rod back to life.
For cork, clean the area with alcohol, sand rough edges, fill pits with cork dust mixed with wood glue, then sand smooth and seal with light varnish.
For EVA, buff the foam, apply a flexible contact adhesive, press a thin foam patch in place, and clamp while it cures.
Take your time aligning patches and trimming edges so the grip feels natural. These steps keep your rod comfortable and let you fish with friends, confident and connected.
Replace a Damaged Rod Handle or Full Grip
Start with admitting the handle is beyond simple patching and decide whether you’ll replace just the grip or the entire handle core. You want a comfortable repair and a sense of belonging to a community that cares for gear.
For grip replacement, remove worn cork or EVA, clean residue, trial fit the new grip, and use contact cement or heat shrink for a snug finish.
For handle upgrading, remove the old core, sand the blank lightly, fit a new core, and glue carefully for lasting strength. Move with patience and ask friends if unsure.
- Choose materials that match your style and use
- Measure twice and trial fit once
- Use gentle heat for tight fits
- Keep workspace clean and welcoming
- Share photos with fellow fishers for feedback
Strip Old Thread Wraps and Old Epoxy Safely
Should you chose to replace the handle, you’ll often find worn thread wraps and sticky epoxy around the guides and near the grip. You want safe removal that keeps the blank intact and brings you back into the repair community, so work slowly.
Use a fresh razor blade to lift and scrape thread from the guide foot toward its base. Scrape from the guide side to make a shallow channel for the new guide. In case acetone feels harsh, try solvent alternatives like isopropyl alcohol or citrus-based cleaners for softer buildup. Wet sand with fine paper to smooth the area, then wipe clean.
Take breaks, check alignment, and lean on fellow hobbyists if needed. You’ll feel proud handing the rod back to life.
Finish: Sand, Polish, and Apply Final Epoxy
Once you’ve removed old wraps and smoothed the blank, it’s time to sand, polish, and apply the final epoxy so your repair looks and performs like new.
You’ll feel proud joining other anglers who care for their gear. Start with fine grit and move to wet sanding to remove tiny bumps. Rinse and dry between grits.
Light polishing brings out the blank color and keeps wraps crisp. Mask off areas you don’t want epoxy on.
Mix final epoxy per directions, pour thin coats, and spin or rotate the rod slowly to avoid drips. Let each coat cure fully before the next.
You’ll appreciate the steady pace and shared craft.
- Use 400 then 800 grit for wet sanding
- Rinse after each pass
- Polish with a soft cloth
- Mask nearby guides
- Rotate while epoxy cures
Preventative Rod Care: Cleaning, Storage, Quick Checks
After you’ve given the blank its final sanding, polishing, and cured epoxy coatings, keep that fresh finish looking and performing great through caring for the rod regularly. You’ll start with simple rod cleaning after each trip. Wipe guides and blank with a soft cloth and mild soap, then rinse and dry. Use acetone only whenever replacing parts or removing stubborn residue.
Next, adopt practical storage methods. Store rods upright in a rack or hung horizontally to avoid warps. Keep them away from heat, direct sun, and damp basements.
Finally, do quick inspections before and after outings. Look for loose guides, cracked thread wraps, or nicks in the blank. Small fixes now prevent big repairs later. You’re part of a group that protects gear and enjoys reliable rods.
Common Mistakes and Troubleshooting Tips
Whenever you’re fixing guides or rewrapping a rod, small mistakes can turn a quick job into a frustrating afternoon, so let’s keep things simple and steady to avoid that.
You belong here with other DIYers, so don’t worry provided you slip up.
Do alignment checks in the beginning and often, and pick glue selection carefully for the job.
In case something feels off, pause and check tape placement, thread tension, and guide seating before the adhesive sets.
- Don’t rush glue application, especially with quick-set epoxy
- Avoid uneven thread tension that causes bumps
- Clean the blank with acetone after removing old epoxy
- Use masking tape to hold guides while you check alignment
- Trim thread close only after knotting securely
Frequently Asked Questions
How Do I Match Replacement Guides to My Rod’s Action and Line Rating?
Match line weight to the rod’s rating, check action compatibility via examining flex, choose a guide with a foot that fits the blank, and pick ring diameter sized for your line to guarantee smooth casting and community esteem.
Can I Use Household Super Glue Instead of Specialized Rod Epoxy?
Want quick results, right? You can use super glue for temporary fixes, but it won’t match epoxy’s long term durability; you’ll feel supported doing quick repairs, yet plan for proper epoxy later for lasting strength.
What Safety Precautions Should I Take When Using Razor Blades and Solvents?
Wear gloves, goggles; ventilation critical-open windows and run a fan. You’ll work safely through cutting away from yourself, keeping a primary-aid kit nearby, storing blades in a blade-safe container, and practicing proper disposal of solvents.
How Long Should Repaired Thread Wraps Cure Before Fishing With the Rod?
You should wait 24–48 hours for curing timeframes under mild conditions; extend to 72 hours in case it’s cooler or more humid. Environmental effects matter, so check bond firmness together with fellow anglers before you fish.
Are There Professional Repair Services for Antique or High-Value Rods?
Yes - you can hire restoration specialists and antique appraisal services who’ll evaluate, repair, and preserve high-value rods; you’ll join a community that respects heritage and craftsmanship while protecting your treasured pieces for future anglers.