Book Appointment Now

How to Spool a Fishing Reel
Spooling a fishing reel is simple and makes a big difference on the water. This guide shows how to choose the right reel and line, strip old line off, tie a solid arbor knot, and wind line evenly with steady tension. It covers how much line to load, avoiding twists and overfilling, plus quick test casts to spot problems. Read this and get back to fishing confident and ready.
Quick How-To: Spool a Reel in 5 Minutes
In case you want to spool your reel in about five minutes, you can do it calm and steady without stress.
You’ll start with opening the bail and threading the line through guides, matching line strength to reel specs. Use a quick speed technique while keeping tension control by pinching the line an inch above the spool.
Tie an arbor knot, pull tight, trim the tag end clean. Close the bail and reel slowly under steady resistance.
Watch the line feed direction and flip spool orientation in case it feeds wrong. Guide the line left and right for even layering and stop once you’re about 1/8 inch from the spool lip.
You’re part of a group that cares, and you’ll feel confident with this simple rhythm.
Which Reel Type? Spinning vs Baitcaster
At the moment you choose between a spinning reel and a baitcaster, consider how much line you need and how much control you want while casting.
Spinning reels usually hold more line for their size and are easier to use, while baitcasters give you finer casting control but need practice to become proficient.
In case you care about line capacity, casting control, and how steep the learning curve is, I’ll walk you through what to expect and how to pick the best reel for your fishing style.
Line Capacity Differences
Should you’re choosing between a spinning reel and a baitcaster, you’ll want to understand how line capacity affects your fishing before you spool up. You’ll look at spool dimensions and line diameters to match gear and tackle needs.
Spinning reels often hold more thin line for distance. Baitcasters usually fit heavier diameters for power and control. That matters whenever you want to belong to a group who fishes confidently.
- Spinning reels: larger spool diameter, more thin line, better for long casts.
- Baitcasters: narrower spools, thicker line, better for heavy cover.
- Mix and match: check reel specs and line diameters together.
- Fill level: leave a small gap to avoid tangles and improve casts.
You’ll feel confident picking the right combo.
Casting Control Needs
You’ve seen how line capacity shapes your choice between spinning reels and baitcasters, and that leads straight into how each reel handles casting control.
You want to belong to a group that fishes confidently, so consider how control feels in your hands. Spinning reels forgive imperfect casts and help while spool tension is low, so you can focus on aim and rhythm. Baitcasters give precision once you tune spool tension and practice thumb pressure, so you can place lures exactly where you want.
Both need good drag adjustment to protect hookups and to keep your cast smooth under load. You’ll welcome tips from peers, and you’ll learn to match reel type to your style, comfort, and the fish you’re chasing.
Learning Curve Required
Picking up a spinning reel will usually feel easier initially, but learning a baitcaster will pay off in case you want extra control and distance.
You belong to a group that learns together, so know that patience practice will turn awkward starts into steady progress. Start simple, ask friends, and celebrate small wins as you build confidence and technique expertise.
- Learn spool basics on a spinning reel initially to avoid premature tangles.
- Move to a baitcaster whenever you want finer casting control and longer casts.
- Spend time adjusting brakes and spool tension to match your line.
- Practice backlash recovery drills in open spaces until it feels natural.
You’ll find others who’ll share tips, cheer your improvements, and keep you motivated.
Which Line? Mono, Fluro, or Braid (And Why It Matters)
You’ll want to pick line based on how much stretch and forgiveness you need, with monofilament giving you a bit of give that can save a stubborn hookup.
At the same time you should understand braid for strength and sensitivity and fluorocarbon for invisibility and abrasion resistance, since they each play different roles depending on fish, water, and technique.
Let’s compare at what point you’d choose mono, braid, or fluoro and how those choices affect casting, knotting, and spool management.
Monofilament: Stretch And Forgiveness
During the period you’re choosing between monofilament, fluorocarbon, or braid, one of the initial things to understand is how much stretch you want in your line, because stretch changes the way you feel a bite and how forgiving your setup is.
Monofilament gives you line elasticity that dampens sudden pulls, which makes missed strikes less likely and helps you feel supported when fish surge. You’ll like how stretch effects protect light knots and rods. You belong here with anglers who choose confidence over raw sensitivity.
- Soft feel: great for topwater and beginners.
- Shock absorption: safer on light gear.
- Knot security: ties easily and holds.
- Cost friendly: easy to replace and forgiving.
Braid Vs Fluorocarbon: Roles
While it could feel confusing at outset, deciding between braid and fluorocarbon comes down to what you need from your line on any given day.
You’ll pick braid whenever you want thin diameter, zero stretch, and powerful hooksets. It feeds far and casts long, but you must watch line abrasion near rocks and guides.
You’ll pick fluorocarbon if invisibility matters because its lower water visibility helps shy fish bite more. Fluoro gives more forgiveness than braid and resists abrasion better in some situations, though it’s stiffer and can tangle.
Many anglers combine both. Tie braid to spool, then attach a fluorocarbon leader. That blend keeps casting performance, adds invisibility, and reduces abrasion risk where it matters most.
You’ll feel confident choosing for conditions.
Tools and Supplies to Gather Before Spooling
A small kit of the right tools makes spooling a reel easier and keeps your fishing day stress free. You’ll feel welcome whenever you pack neatly and share gear with friends. Gather items that steady your task and build confidence.
- Spare spool holders and a clean spool of line so you don’t fumble at the edge.
- Line cutters for neat trims and quick adjustments during winding.
- Small towel, wetting bottle, and gloves to control slip and keep hands steady.
- Pen, rubber bands, and a spool strap to hold line tension in case you’re working solo.
These tools work together. Use spool holders with gentle tension, then cut and secure with line cutters. You’ll spool smoothly and enjoy company whilst you fish.
Remove Old Line and Inspect the Reel
Start through cutting and removing the old line so you can clearly see the spool and bail.
Then inspect the spool and bail for nicks, corrosion, or loose parts, and clean any dirt or old grease with a soft cloth.
Finally, lubricate moving parts lightly and examine the bail action to make sure everything runs smoothly before you thread new line.
Cut And Remove Line
Cut the old line close to the reel and pull it off gently so you can see what’s left on the spool and how the reel looks. You’ll feel better understanding the reel is clean before you start.
For safe line cutting and line disposal follow these steps:
- Use sharp scissors or clippers to cut the line near the spool.
- Remove coils slowly so you don’t tug on bearings or the drag.
- Bundle old line and secure it for proper line disposal at a recycle point or trash.
- Wipe the spool area with a cloth and check for debris.
You’re part of a community that cares for gear and the water. Take your time, ask a friend for help should you need, and keep the reel tidy for the next spool.
Inspect Spool And Bail
Now that you’ve cleared away the old line and given the spool a quick wipe, take a careful look at the spool and bail to make sure they’re ready for new line. You’re part of a group that cares for gear, so check spool condition for nicks, grooves, or sharp edges that can cut line. Examine bail functionality through opening and closing it several times. Listen for smooth clicks and watch for firm alignment. Should something feel off, you’ll want to record it before spooling. Use the table below to track simple checks so you feel confident and included in the care process.
| Check Item | What to Look For |
|---|---|
| Spool condition | Nicks, burrs, even surface |
| Bail functionality | Smooth open close |
| Alignment | Centered, no wobble |
| Thread path | Clear, unobstructed |
Clean And Lubricate Parts
Give the reel a gentle once-over before you touch the new line, because a clean, well-lubricated reel makes every cast feel better and lasts longer.
You’ll remove old line, wipe away grit, and inspect gears and bearings for wear. Use mild cleaning solvents sparingly and let parts dry.
Then apply lubrication techniques suited to your reel, a drop at a time, so you don’t overdo it.
- Remove old line and free spool debris.
- Clean spool, bail, and handle with solvents and a soft cloth.
- Inspect gears, drag, and bearings for corrosion or play.
- Apply oil and grease using proper lubrication techniques.
You belong to anglers who care for gear. Treat the reel gently, follow steps, and you’ll feel the difference on every cast.
Tie the Right Knot to Attach New Line
Which knot should you trust initially as you attach new line to your reel? Start with an arbor knot because it holds well on the spool and is easy to tie.
You’ll feel part of a group that values reliable gear once you learn knot durability and try alternative knots like a simple overhand or a triple granny for extra hold.
Tie the chosen knot snug, pull tight to cinch it against the arbor, and trim the tag end to about 1/8 inch. Wet the line slightly prior to final tightening so it seats smoothly.
As you work, keep your fingers close to guide the line and maintain steady tension. These steps help you spool cleanly and join fellow anglers who care about craft.
Prevent Line Twists: Spool Orientation Explained
Curious how the way your line sits on the spool can make or break your cast? You want to belong to a group that casts clean and confidently. Reel alignment matters.
If the spool feeds opposite the bail rotation you’ll get twists that lead to line backlash and frustration. Check the spool label orientation and rotate the spare spool so the line comes off the same way the bail turns. Ask a friend to hold a meter of line while you reel slowly and watch for loops.
- Match spool rotation to bail movement.
- Position spool label facing up.
- Reel slowly while watching for twists.
- Use a spooling tool or helper.
These steps keep you casting smoothly and feeling supported.
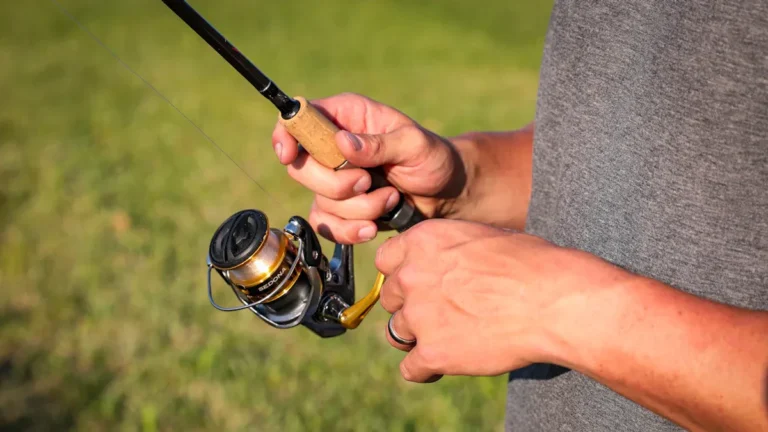
Apply Proper Tension While Loading Line
As you start spooling, keeping steady tension on the line will save you from loose coils and annoying tangles down the road. You want to feel confident and connected as you load line tension onto the reel. Use a finger pinch about one foot above the reel or a simple pen through the spool to create steady resistance. Keep your grip gentle but firm so the line feeds evenly and layers flat. In the event that you notice slack, slow the crank and add steadier pressure with your finger pinch. This helps everyone feel capable and included, whether you’re teaching a friend or learning together. Below is a quick guide to pressure, placement, and pace.
| Pressure | Placement | Pace |
|---|---|---|
| Light | 12 in | Slow |
| Firm | 1 ft | Steady |
| Steadier | Above reel | Moderate |
Step-by-Step: Spooling a Spinning Reel
You’ve just learned how to keep steady tension while loading line, and now you’ll use that same steady hand to spool a spinning reel correctly. You belong here with anglers who care about neat setups.
Start upon opening the bail, threading line through guides, and tying an arbor knot to secure the line to the spool. Recall line wetting provided the label suggests it to reduce heat and slippage.
- Position spool with label up and check feed direction.
- Pinch line one foot above reel and keep steady tension.
- Close bail and turn handle slowly while guiding line evenly.
- Fill to about 1/8 inch below lip and trim tag end.
You’ll feel confident once layers sit flat and even.
Step-by-Step: Spooling a Baitcasting Reel
When you switch from a spinning reel to a baitcasting reel, you’ll notice a few small but essential changes that make spooling feel different and more precise.
You’ll begin by securing a solid arbor knot variations such as an arbor plus overhand or a triple granny to the spool, then tighten and trim.
Unlike spinning reels, you won’t use bail positioning the same way, so keep the line aligned with the level wind or guide. Pinch the line about a foot above the reel for steady tension while a friend or a pen holds the spool.
Wind slowly, guiding the line left and right for even layering. Check feed direction and flip the spool should coils bunch. You’ll feel confident as the spool fills.
How Much Line to Spool & Measure Capacity
How much line should you spool onto your reel so you won’t lose fish or waste time fixing tangles later? You want enough line for distance and safety without overfilling. Check your reel’s stamped capacity and do a quick spool calibration in case of marking line depth on the spool or using tape. That keeps everyone fishing together confident.
- Measure the reel capacity label and match line weight.
- Fill to about 1/8 inch below the lip for best casting and fewer tangles.
- Use a depth marker to account for braid versus mono stretch differences.
- Recheck spool calibration after a few casts and adjust should layers bunch.
These steps make you feel capable and included, so your buddy group trusts your setup.
Common Spooling Mistakes and How to Avoid Them
At the moment you initially commence spooling a reel, it’s easy to make small mistakes that cause big problems later, so let me walk you through the most common ones and how to stop them before they ruin a day on the water. You belong here with fellow anglers learning to avoid line tangles and tension errors. Stay patient, ask for help, and trust the process.
| Mistake | Cause | Fix |
|---|---|---|
| Line twists | Spool rotation mismatch | Match rotation direction |
| Closed bail | Threading while closed | Open bail first |
| Loose coils | No consistent pressure | Pinch line, steady tension |
| Overfill | Too much line | Stop 1 1/8 inch from lip |
| Uneven lay | No guide use | Guide line across spool |
Practice slowly and you’ll feel confident.
Quick Test Casts and Signs You Need New Line
Want to know whether your new spool is working or whether your line is past its prime? You’ll want to do a few quick trial casts and watch for clear signs of line degradation and drops in casting accuracy.
Trial casts let you feel drag, snags, and uneven lay on the spool. You’re not alone in this; we all want gear that performs.
- Cast feel: rough snaps or rattles mean damage or memory.
- Visual check: frays, nicks, or discoloration signal weakening.
- Distance change: shorter, inconsistent casts show reduced casting accuracy.
- Tangles and wind knots: frequent birds nests mean replacement is due.
Do trial casts in calm space, inspect closely, and swap line whenever multiple signs appear.
Frequently Asked Questions
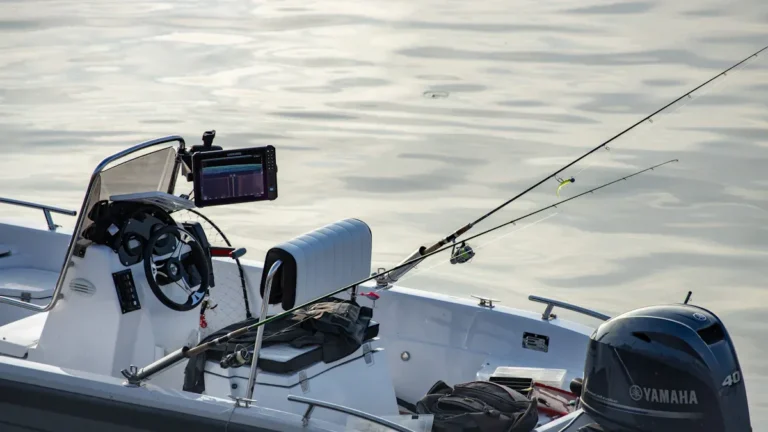
Can I Spool a Reel While Standing in a Boat With Limited Space?
Yes - you can, but prioritize boat stability and smart space management: brace feet, face forward, keep spool label up, pinch line for tension, ask a buddy to hold spool or use a pen, and reel slowly for even layering.
Can Colder Temperatures Make My Line Brittle During Spooling?
Yes - in cold you’ll feel line stiffness like brittle twine; colder temperatures reduce line elasticity, so temperature effects can make lines snap or crease during spooling. You’ll want gentler handling and warmer storage to protect your gear.
How Often Should Braided Backing Be Used Under Monofilament?
Use braided backing any time you want extra line durability or frequently fish harsh conditions; you’ll typically add it for heavy saltwater, long casts, or at the time spool capacity matters, making you feel confident and part of the angling crew.
Is It Okay to Mix Different Line Types on the Same Spool?
Yes - you can mix lines, but check line compatibility and maintain tension control; imagine layers singing together, so match diameters and knot types, keep steady pressure, and you’ll belong to anglers who fish smarter, not harder.
Can Spooled Line Degrade From UV Exposure in Storage?
Yes - UV damage can weaken spooled line over time, so you’ll want to store line away from sunlight. Keep reels in cool, dark places or sealed containers so your gear stays reliable and the community can fish together.